 tokki
tokki사내 위키에 작성한 글의 초안입니다!
Strapi란?
Strapi는 NodeJS 기반 헤드리스 CMS입니다. 헤드리스 CMS는 콘텐츠 저장소 역할을 하는 백엔드 전용 콘텐츠 관리 시스템입니다. 프론트엔드만 가져다 붙이면 컨텐츠에 접근할 수 있는 시스템이라고 생각하시면 될 듯 합니다. Strapi, Ghost 등이 있습니다. 그 중 가장 깃허브 스타 수가 많은 것이 Strapi입니다.
기본 admin 패널에서 설정하는 것 이외에 데이터를 주물주물 하는 등의 작업 또한 커스텀 코드 작성을 통해 자유롭게 할 수 있습니다. 이 글에서는 그 부분에 대해서는 다루지 않겠습니다.
프로젝트 세팅하기
npx create-strapi-app 프로젝트명 --quickstart 혹은 yarn create strapi-app 프로젝트명 --quickstart 으로 설치 후 npm run develop 혹은 yarn develop 으로 실행합니다.
세팅 후 계정을 생성하면 어드민 패널에 접근할 수 있습니다.

데이터베이스 구조 잡기
Collection Types
컬렉션 타입은 article, comment 등 타입에 해당하는 데이터가 여러 개 있어야 할 때에 사용합니다.
- article
- title (text)
- content (rich text)
- user (relation)
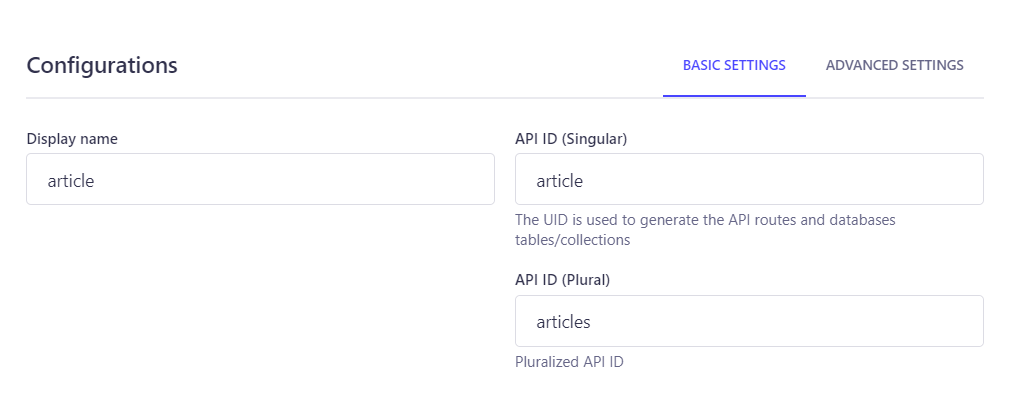
데이터를 가져올때에는 목록 접근 시 API ID (Plural), 개별 접근 시 API ID (Singular)로 접근하면 됩니다. Display name만 입력하면 알아서 생성해주기도 하고, 직접 입력할 수도 있습니다.
Single Types
싱글 타입은 타입에 해당하는 데이터가 한 개 있어야 할 때에 사용합니다. about us 페이지 내용 등이 들어갈 수 있겠죠. API ID (Plural)은 사용되지 않습니다.
- footer
- logo (media)
- content (text)
Components
모든 컨텐츠 타입에서 공유하고 재사용할 수 있는 구조입니다.
- page (component)
- section (repeatable component)
- title (text)
- subtitle (text)
- content (rich text)
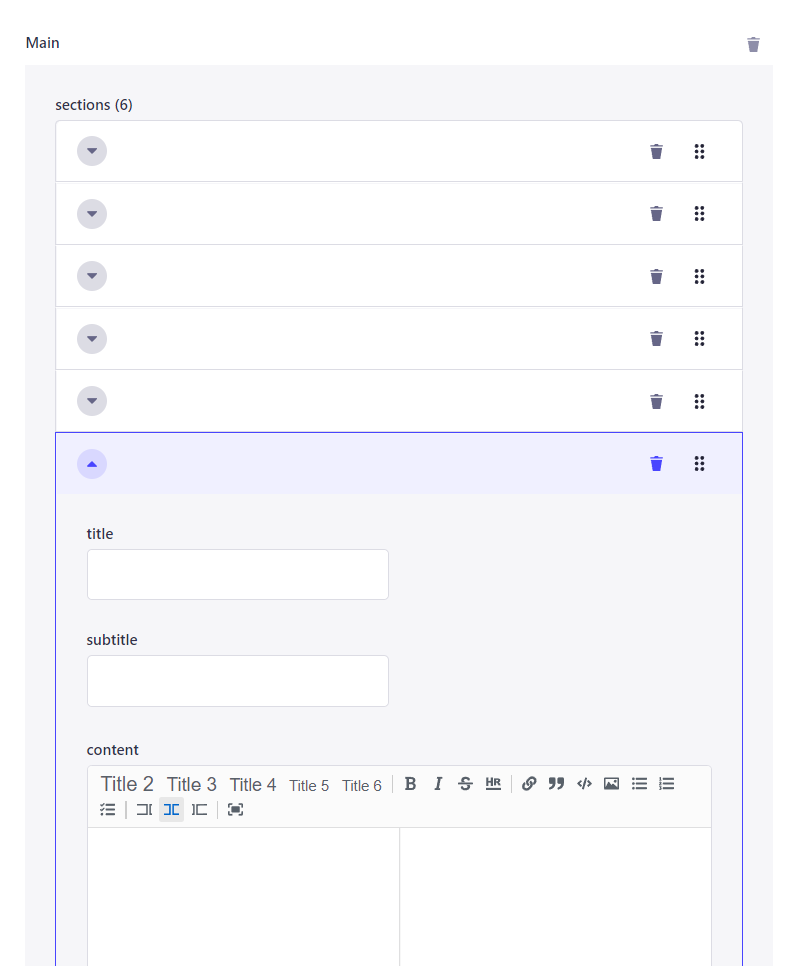
- section (repeatable component)
위와 같이 component 내부에 component를 넣어서, 다음과 같이 표시되게 만들 수 있습니다.
⚠️ 컴포넌트 생성 순서에 따라 컴포넌트 내부에 컴포넌트를 넣을 수 없는 경우가 있는데요, 이 경우 코드 내에서 수정해주면 됩니다.
src/components/컴포넌트 그룹명/컴포넌트명.json
파일을 열어보시면 아래와 같은 구조일 것입니다. 제가 images 추가한 것 참고해서 원하는 컴포넌트를 attribute로 추가할 수 있습니다.
{ "collectionName": "components_컴포넌트 그룹명_컴포넌트명", "info": { "displayName": "컴포넌트명", "icon": "align-left" }, "options": {}, "attributes": { "title": { "type": "string" }, "subtitle": { "type": "string" }, "content": { "type": "richtext" }, "images": { "type": "component", "repeatable": true, "component": "text-component.image-component" }, } }
GraphQL (optional)
npm run strapi install graphql 혹은 yarn strapi install graphql 으로 플러그인을 설치합니다.
http://localhost:1337/graphql 에서 쿼리를 직접 날려볼 수 있습니다.
쿼리는 다음 예시와 같이 작성합니다.
{ footer { data { attributes { logo content } } } }
AWS에 배포하기
heroku에 배포하는 것은 쉽고 간편하고 (배포는 공식 문서 참고) 프리 티어의 경우 무료지만, heroku 서버에는 이미지를 저장할 수 없기 때문에 이미지 서빙이 필요할 경우는 S3나 minio 등의 버킷을 이용해야 합니다. 그래서 실 서비스의 경우 AWS에 배포하는 것을 추천드립니다. 대신 t2.small 이상의 인스턴스를 요구하기 때문에 비용이 발생합니다.
AWS의 EC2, RDS, S3를 이용해 배포할 것입니다. EC2는 서버, RDS는 데이터베이스, S3는 이미지 버킷입니다.
root user 혹은 IAM user로 AWS 콘솔에 로그인합니다. IAM user의 경우 ec2, rds, s3에 대한 full access 권한이 있어야 합니다.
배포 준비
프로젝트 폴더에서 npm install pg 해줍니다. 우리는 PostgresSQL을 사용할 거니까요.
프로젝트 내의 ./config/database.js에 접근해
module.exports = ({ env }) => ({ connection: { client: "postgres", connection: { host: env("DATABASE_HOST", "127.0.0.1"), port: env.int("DATABASE_PORT", 5432), database: env("DATABASE_NAME", "strapi"), user: env("DATABASE_USERNAME", ""), password: env("DATABASE_PASSWORD", ""), }, useNullAsDefault: true, }, });
추가해줍니다. 그 후 npm install @strapi/provider-upload-aws-s3 로 S3 프로바이더도 설치합니다.
./config/plugins.js 에 접근해서 다음 코드를 넣어줍니다.
module.exports = ({ env }) => ({ upload: { config: { provider: 'aws-s3', providerOptions: { accessKeyId: env('AWS_ACCESS_KEY_ID'), secretAccessKey: env('AWS_ACCESS_SECRET'), region: env('AWS_REGION'), params: { Bucket: env('AWS_BUCKET_NAME'), }, }, // These parameters could solve issues with ACL public-read access — see [this issue](<https://github.com/strapi/strapi/issues/5868>) for details actionOptions: { upload: { ACL: null }, uploadStream: { ACL: null }, } }, } });
또, ./config/middleware.js 에 접근하여 아래 cors 설정을 추가해줍니다.
module.exports = [ ..., { name: "strapi::cors", config: { enabled: true, header: "*", origin: [ "<http://localhost:1337>", // 개발 테스트용 // 여기에 cors 허용할 도메인 ], }, }, ];
EC2
EC2에서 새 인스턴스를 만들어줍니다.
- Application and OS Images: Ubuntu Server 22.04 LTS (HVM), SSD Volume Type
- ssh 접속을 위해 key pair 생성해서 다운받아 둡니다.
- Instance type: t2.small 이상
- ✅ Allow SSH traffic from anywhere
- ✅ Allow HTTPs traffic from the internet
- Configure storage: General Purpose SSD (gp2)
security group에서 다음 항목을 설정해줍니다:
- Type: SSH, Protocol: TCP, Port Range 22, Source: ::/0
- Type: HTTP, Protocol: TCP, Port Range 80, Source: 0.0.0.0/0, ::/0
- Type: HTTPS, Protocol: TCP, Port Range 443, Source: 0.0.0.0/0, ::/0
- Type: Custom TCP Rule, Protocol: TCP, Port Range 1337, Source: 0.0.0.0/0
1337 포트는 https 설정 이후 제거할 것입니다.
RDS
이제 데이터베이스를 연결해줄 것입니다. RDS에서 데이터베이스를 만들어줍니다.
- Configuration: PostgreSQL 10.x-R1
- Templates: Free Tier
- ⬜ Auto generate a password
- 마스터 비밀번호 생성
- Additional configuration
- Initial database name: strapi
S3
S3 이미지 버킷을 만들어봅시다.
- ⬜ Block all public access
- ⬜ Block public access to buckets and objects granted through new access control lists (ACLs)
- ⬜ Block public access to buckets and objects granted through any access control lists (ACLs)
- ✅ Block public access to buckets and objects granted through new public bucket or access point policies
- ✅ Block public and cross-account access to buckets and objects through any public bucket or access point policies
서버 세팅 및 테스트
mv ec2-strapi-key-pair.pem ~/.ssh/ 로 ssh 등록 후 chmod 400 ~/.ssh/ec2-strapi-key-pair.pem 로 권한을 줍니다.
ssh -i ~/.ssh/ec2-strapi-key-pair.pem ubuntu@1.2.3.4 ssh로 서버에 접근합니다.
cd ~ curl -sL <https://deb.nodesource.com/setup_14.x> | sudo -E bash - sudo apt-get install nodejs node -v && npm -v
노드 버전과 npm 버전은 각각 v14.x.x, 6.x.x 이어야 합니다.
cd ~ mkdir ~/.npm-global npm config set prefix '~/.npm-global' sudo nano ~/.profile
.profile에 접근해서 다음과 같은 줄을 맨 밑에 추가해줍니다.
export PATH=~/.npm-global/bin:$PATH
그 후 시스템 변수 업데이트!
source ~/.profile
이제 우리의 Strapi 프로젝트를 클론해오면 됩니다. 프로젝트 폴더로 가서 빌드해줍니다.
npm install NODE_ENV=production npm run build
npm install pm2@latest -g 로 pm2를 설치합니다.
cd ~ pm2 init sudo nano ecosystem.config.js
설정 파일을 다음과 같이 작성하면 됩니다.
module.exports = { apps: [ { name: 'your-app-name', // Your project name cwd: '/home/ubuntu/my-project', // Path to your project script: 'npm', // For this example we're using npm, could also be yarn args: 'start', // Script to start the Strapi server, `start` by default env: { NODE_ENV: 'production', DATABASE_HOST: 'your-unique-url.rds.amazonaws.com', // database Endpoint under 'Connectivity & Security' tab DATABASE_PORT: '5432', DATABASE_NAME: 'strapi', // DB name under 'Configuration' tab DATABASE_USERNAME: 'postgres', // default username DATABASE_PASSWORD: 'Password', AWS_ACCESS_KEY_ID: 'aws-access-key-id', AWS_ACCESS_SECRET: 'aws-access-secret', // Find it in Amazon S3 Dashboard AWS_REGION: 'aws-region', AWS_BUCKET_NAME: 'my-project-bucket-name', }, }, ], };
물론 환경변수는 .env 파일로 넣어도 됩니다.
cd ~ pm2 start ecosystem.config.js
이렇게 하면 http://your-ip-address:1337/에 테스트 배포가 됩니다.
NginX와 https 설정
NginX 설치
NginX를 설치합니다. 따로 설명은 않겠습니다.
/etc/nginx/sites-available 에서
server { # Listen HTTP listen 80; server_name api.example.com; location / { # First attempt to serve request as file, then # as directory, then fall back to displaying a 404. proxy_pass <http://0.0.0.0:1337>; } # Redirect HTTP to HTTPS return 301 https://$host$request_uri; }
이런 형태인지 확인해줍니다. 1337 포트를 HTTP로 접근했을 때 보여주게 설정하는 것입니다. (이제 EC2에서 1337 포트는 접근 못하게 해도 됩니다.)
Certbot으로 https 설정하기
이제 Certbot으로 인증서를 발급해서 설치해줄 차례입니다.
sudo mkdir -p /var/www/_letsencrypt && chown www-data /var/www/_letsencrypt sudo sed -i -r 's/(listen .*443)/\\1;#/g; s/(ssl_(certificate|certificate_key|trusted_certificate) )/#;#\\1/g' /etc/nginx/nginx.conf sudo systemctl reload nginx sudo certbot certonly --webroot -n --agree-tos --force-renewal \\ -w /var/www/_letsencrypt \\ --email <your-email> \\ -d cms.<yourdomain.com> \\ -d staging-cms.<yourdomain.com> \\ -d dev-cms.<yourdomain.com> sudo sed -i -r 's/#?;#//g' /etc/nginx/nginx.conf sudo systemctl reload nginx
이렇게 하면 해당 도메인에 https로 접근할 수 있습니다.
'Web > Backend' 카테고리의 다른 글
| [백엔드 스터디] 2. 서버를 띄워보자 (0) | 2022.09.27 |
|---|---|
| [백엔드 스터디] 1. 익스프레스 찍어먹기 (0) | 2022.09.26 |
| [GCP] 구글 클라우드 플랫폼에 Nginx로 리액트 프로젝트 배포하기 (2) | 2020.11.29 |
| [JWT] JSON Web Token (0) | 2020.08.19 |
| [GCP] 구글 클라우드 DNS에 도메인 연결하기 (2) | 2020.07.20 |
댓글