 tokki
tokki전체 코드는 github에서 확인하실 수 있습니다.
GitHub - r-4bb1t/chatgpt-widget
Contribute to r-4bb1t/chatgpt-widget development by creating an account on GitHub.
github.com
브라우저에 20+개의 탭을 켜놓고 사는 현대인들... (저만 그런가요?) ChatGPT를 쓸 일이 많은데, 열어놓은 탭 중 ChatGPT를 찾기도 번거롭고 화면을 전환하는 것도 번거로웠습니다. 모니터를 하나만 쓰는 랩탑 유저의 슬픔이기도 하죠. 화면 위에 항상 ChatGPT가 띄워져 있으면 좋겠다는 생각에, 직접 만들어보기로 했습니다.
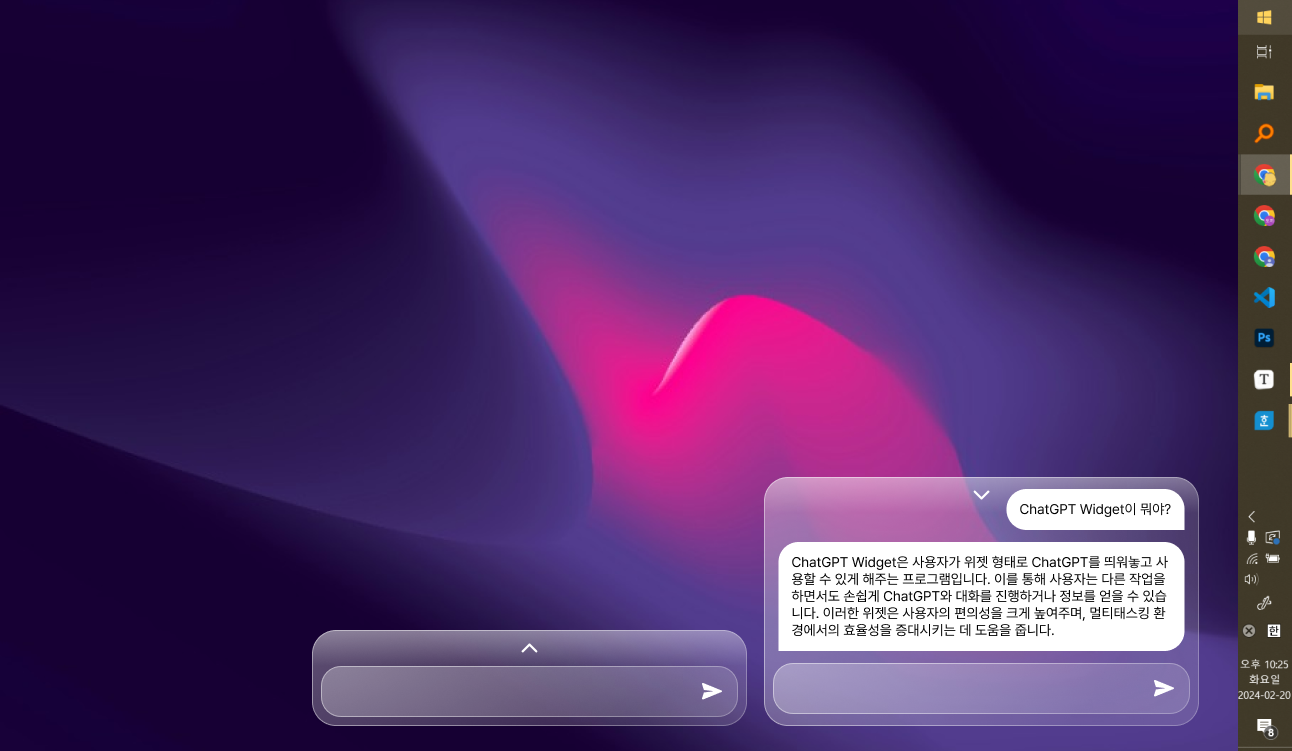
우선 기본적인 구성은 figma로 위와 같이 잡아보고, PyQT5로 GUI를 구성해서 만들어보기로 했습니다.
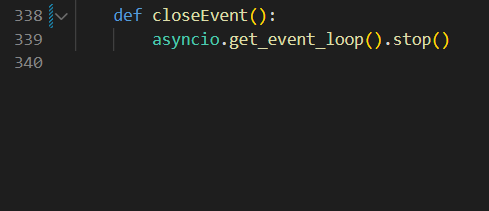
메인 위젯의 총 코드는 339줄... 분리하고 싶은데 이건 나중으로 미뤄봅니다.

일단 화면에 계속 띄워져 있어야 하기 때문에, height를 줄이고 늘리는 기능을 맨 먼저 만들었어요.
ChatGPT의 도움을 조금 받아(..?) 만든 높이 토글 함수.
def toggleSize(self):
    startGeometry = self.geometry()

    if self.isExpanded:
        self.sizeButton.setIcon(QtGui.QIcon("icons/chevron-up.png"))
        self.isExpanded = False
        endHeight = self.originalHeight
    else:
        self.sizeButton.setIcon(QtGui.QIcon("icons/chevron-down.png"))
        self.isExpanded = True
        endHeight = 600

    endY = startGeometry.y() + startGeometry.height() - endHeight
    endGeometry = QRect(startGeometry.x(), endY, startGeometry.width(), endHeight)

    self.animation = QPropertyAnimation(self, b"geometry")
    self.animation.setDuration(100)
    self.animation.setStartValue(startGeometry)
    self.animation.setEndValue(endGeometry)
    self.animation.start()
    self.animation.finished.connect(self.scrollChatLogBottom)

    self.scrollChatLogBottom()
아무래도 높이가 줄어들고 늘어나는 건 애니메이션이 적응되면 좋을 것 같았고, 높이가 바뀌면 스크롤도 자동으로 맨 밑으로 내려가야 하기 때문에 finished에 관련 함수를 연결해주었습니다.
from PyQt5 import QtWidgets, QtCore
from PyQt5.QtCore import Qt


class ChatBubble(QtWidgets.QWidget):
    def __init__(self, text, is_user=True, maxWidth=380):
        super().__init__()
        self.layout = QtWidgets.QHBoxLayout()

        self.label = QtWidgets.QLabel(text)
        self.label.setTextInteractionFlags(Qt.TextInteractionFlag.TextSelectableByMouse)
        self.label.setMaximumWidth(maxWidth)

        self.label.setStyleSheet(
            """QLabel { background-color: qradialgradient(cx:0, cy:0, radius: 1, fx:0, fy:0, stop:0 rgba(0, 0, 0, 60), stop:1 rgba(0, 0, 0, 30));
                border: 1px solid rgba(255, 255, 255, 0.6);
                color: white; %s;
                padding-top: 12px; padding-bottom: 12px; padding-left: 8px; padding-right: 8px;
                }"""
            % (
                """border-top-left-radius: 10px;
                border-top-right-radius: 10px;
                border-bottom-right-radius: 0;
                border-bottom-left-radius: 10px;"""
                if is_user
                else """border-top-left-radius: 10px;
                border-top-right-radius: 10px;
                border-bottom-right-radius: 10px;
                border-bottom-left-radius: 0;"""
            )
        )

        if is_user:
            self.layout.addWidget(self.label, alignment=QtCore.Qt.AlignRight)
        else:
            self.layout.addWidget(self.label, alignment=QtCore.Qt.AlignLeft)

        self.setLayout(self.layout)
        self.layout.setContentsMargins(8, 8, 8, 8)
        self.label.setWordWrap(True)
        self.setFixedHeight(
            max(self.label.sizeHint().height(), self.label.heightForWidth(maxWidth))
            + 16
        )
        print(text)
        self.updateGeometry()
가장 애를 많이 먹었던 ChatBubble 위젯. 텍스트의 길이에 따라 높이가 달라져야 하는데, self.label.sizeHint().height()을 기준으로 해도, self.label.heightForWidth(maxWidth)을 기준으로 해도 높이가 잘릴 때가 있더라고요. 그래서 과감히 둘 중 max값으로 선택했습니다. 이렇게 해놓으니 제가 사용하는 동안 한 번도 잘리지 않더라고요.
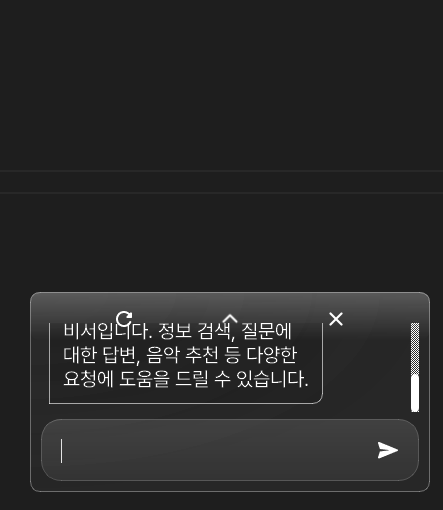
채팅을 보내는 부분.
async def sendChat(self):
    userInput = self.chatInput.toPlainText().strip()
    self.chatInput.clear()
    if userInput:
        self.addChatBubble(userInput, True)

        self.addChatBubble("...", False)
        self.scrollChatLogBottom()

        response = await getGPTResponse(userInput)

        self.chatLog.takeItem(self.chatLog.count() - 1)

        self.addChatBubble(response, False)
        self.scrollChatLogBottom()
이렇게 sendChat을 비동기 함수로 작성해주고,
def keyPressEvent(event):
    if event.key() == QtCore.Qt.Key_Return:
        if event.modifiers() & QtCore.Qt.ShiftModifier:
            self.chatInput.insertPlainText("\n")
        else:
            asyncio.create_task(self.sendChat())
    else:
        QtWidgets.QTextEdit.keyPressEvent(self.chatInput, event)
    lineCount = self.chatInput.document().lineCount()
    self.chatInput.setFixedHeight(20 + 20 * min(lineCount, 4))
TextEdit에서 키가 눌리면 엔터키일 경우(그리고 시프트가 안 눌렸을 경우) asyncio에 task를 추가해줬어요.
이렇게만 하면 되는 줄 알았는데 PyQT에서는 또 따로 설정을 해줘야 하더라고요.
import sys
from PyQt5 import QtWidgets

import asyncio
import qasync

from widget import ChatWidget

if __name__ == "__main__":
    app = QtWidgets.QApplication(sys.argv)

    chat_widget = ChatWidget()

    loop = qasync.QEventLoop(app)
    asyncio.set_event_loop(loop)

    with loop:
        loop.run_forever()
이런 식으로 PyQT와 asyncio의 이벤트 루프를 동기화시켜줘야 한다고 하네요.
from openai import AsyncOpenAI
from dotenv import load_dotenv
import os

load_dotenv()

client = AsyncOpenAI()
api_key = os.getenv("OPENAI_API_KEY")

history = []


async def getGPTResponse(message):
    global history
    history.append({"role": "user", "content": message})
    client.api_key = api_key
    response = await client.chat.completions.create(
        model="gpt-4",
        messages=history[-6:]
        + [
            {"role": "system", "content": "You are a helpful assistant."},
            {"role": "user", "content": message},
        ],
    )
    history.append(
        {"role": "assistant", "content": response.choices[0].message.content}
    )
    return response.choices[0].message.content


def resetHistory():
    global history
    history = []
GPT의 답변을 받아오는 부분은 여기. 겸사겸사 기록 초기화 부분도 넣었습니다. 따로 서버를 붙이진 않을 거라 그냥 기록 관리는 로컬로..
일단 제가 혼자 쓸 정도로는 완성된거같아요! 😊
'Python' 카테고리의 다른 글
| [Python] 영수증 프린터 가지고 놀기 (2) | 2023.11.13 |
|---|
댓글